In part 1 of this series I explained how to create a free Micro Linux server on Amazon EC2 suitable for running a small Minecraft server. In this article I will discuss how to connect to your new server, install Minecraft and configure it.
1. Connecting to your server for the first time
By now we have a server and a public IP address. So next we need to connect to it so we can install Minecraft etc. We will be using Secure Shell (SSH) because, well, it’s secure. The best tool for SSH on Windows continues to be Putty. Download Putty from here and install it. While you are there make sure you also download PuttyGen as you are going to need it for the next step.
a. Converting your keypair from Amazon EC2 to Putty format
Amazon provides you a keypair in .pem format. Putty does not like that format so you need to use PuttyGen to convert the keypair into the .ppk format it likes.
Run PuttyGen and click the Load Button.
On the file selection dialogue make sure you select all files. Now select the .pem file you downloaded from Amazon EC2 for your server. PuttyGen should say it successfully imported the foreign key. Click save private key and save the .ppk fie somewhere.
Close PuttyGen.
b. Configure Putty to connect to your server
Start Putty. Enter your IP address. I have hidden mine.
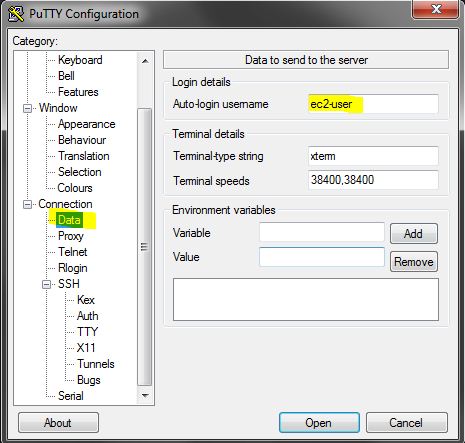
In the left pane, select Connection | Data and enter the default user ID ec2-user
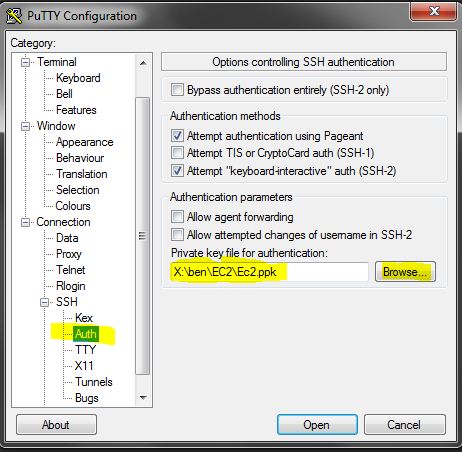
In the left pane select Connection | SSH | Auth and browse to the .ppk file you made in the previous step.
That’s all the configuration needed. You will probably want to save the config for next time. Go back to the main Session screen and click Save to save the session properties. Next time you start Putty you just need to load the appropriate settings.
c. Connect and login
To connect to your EC2 server. Click Open. In a few seconds you will get a nice new linux prompt like this (I have masked my IP addresses):
You are in and talking to your EC2 server. Remember it’s just a Linux box under the hood so all your standard Linux commands work. No GUI so if you don’t know any Linux commands now may be a good time to learn.
I will teach you the first few to get you started.
pwd prints the current working directory and tells you which folder (directory) you are in.
cd changes directory just like in DOS
cp copies a file
mv moves or renames a file
ls -al lists all the files in the current folder with details
rm removes a file or files (careful with this one)
top shows what is running
cat displays the contents of a test file on the screen
nano a simple text editor
wget gets (download) a file from a web site using a URL
man <command> explains how to use a command and what it does (manual pages)
2. Download Minecraft server
From your linux prompt type:
mkdir MinecraftServer
cd MinecraftServer
wget http://www.minecraft.net/download/minecraft_server.jar
This will create a new folder and copy the latest version of the Minecraft server to it.
3. Start Minecraft server
Type the following command:
sudo java -Xmx512M -Xms512M -jar minecraft_server.jar nogui
This command invokes the Java VM, sets the minimum and maximum memory to use and starts the Minecraft server. Notice I have used 512M as the memory size rather than the suggested 1024M on the Minecraft sites. This is because we are running on a micro Linix server and we only have 612MB in total. If you want more memory you are going to have to upgrade to a larger EC2 but you are also going to have to pay for it.
The first time the server starts it creates “spawn areas”. This can take some time. Just let it go. It sometimes seems to get stuck – it isn’t. Stop screen watching and get a coffee.
Once the server is finished you can enter commands as “Admin”. Type help to display this screen:
To stop your server type stop.
4. Connect from Minecraft client using IP address and test
Once the server has completed creating its spawn areas you can connect to it from your Minecraft client. Just enter the IP address that Amazon has assigned your server. In a few seconds you should be connected to your very own brand new Minecraft server.
Remember this is a free Minecraft server in the cloud running on the smallest virtual server that money cannot buy. It’s not going to support 50 simultaneous connections. It will quite happily support you and one or two Minecraft buddies. If you want less lag and more performance, you will need to pay for a larger EC2 server.
In part 3 I explain how to upgrade your server to a Small instance and still save money.


